Add New Relic in Heroku using Play 2 (Java) Application

Installing New Relic in Heroku using a Play 2.4.x (Java) Application

Hi guys, just wanted to write a small post about installing New Relic on a Play Framework App (version 2.4.x) in Heroku. I struggled a bit with some of the instructions I found through the internet (including Heroku’s and New Relic’s).

What I did to make it work:

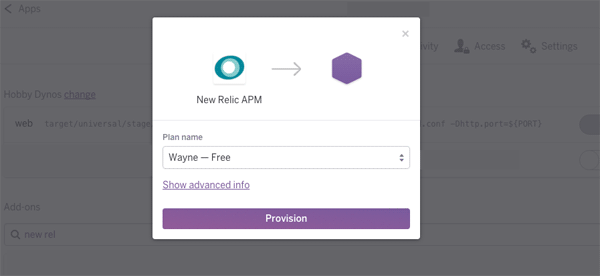
Install the New Relic Addon through Heroku’s interface

New Relic Installation Screen

New Relic Installation Screen

This will install the add-on and configure somethings for you (like environment variables). If you do `heroku config` you’l see the following variables:

  • NEW_RELIC_APP_NAME:          APP_NAME
  • NEW_RELIC_LICENSE_KEY:       YOUR_LICENSE_KEY
  • NEW_RELIC_LOG:               stdout

In order for the addon to work you need to enable it’s Java agent, by adding the dependencies to your build.sbt file:

libraryDependencies ++= Seq(

  //Your other dependencies

  “com.newrelic.agent.java” % “newrelic-agent” % “3.25.0”,

   “com.newrelic.agent.java” % “newrelicapi” % “3.25.0”

)

Notice that at the time of writing ( 20/02/2016 – February 20th ) the latest version of the agent is 3.25. You should always check the latest version at maven central and use that.

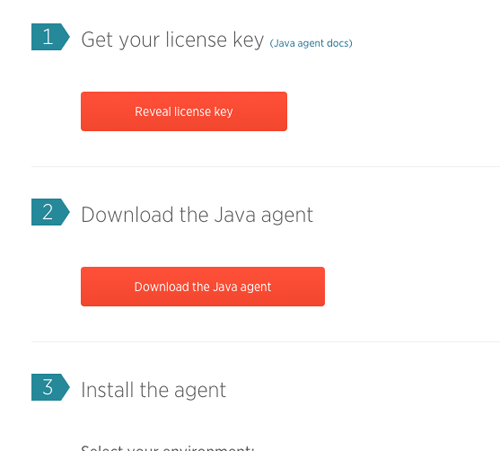
Now you need the “newrelic.yml” configuration file. You can download when you configure your account in new relic. Once you go to your New Relic account page you’ll see the following screen : Choose “Java”.
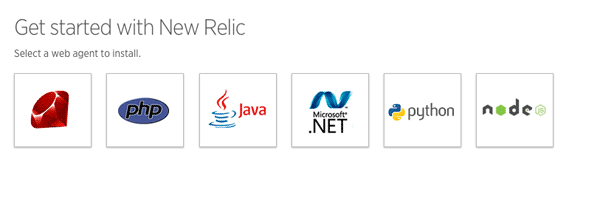
new_relic-1After you choose Java, the next screen will show this:

new-relic-3

Click the “Download the Java agent” button. This will download a zip file with the java agent and the newrelic.yml file. My suggestion is copy the newrelic.yml file to the Play Framework’s conf directory ( conf/newrelic.yml ).

Add all the changes to git, and push to heroku.

git add build.sbt

git add conf/newrelic.yml

git commit -m ‘Add new relic addon’

git push heroku master

Now you only to configure the environment variables to run the agent.

heroku config:set JAVA_OPTS=”Xmx334m -Xss512k -XX:+UseCompressedOops -javaagent:target/universal/stage/lib/com.newrelic.agent.java.newrelic-agent-3.25.0.jar -Dnewrelic.config.file=conf/newrelic.yml

Now, I’m not sure if target/universal/stage/lib/com.newrelic.agent.java.newrelic-agent-3.25.0.jar will be the same throughout time, but if you get errors like “cannot open zip file” or “cannot read manifest” I suggest you do the following in your terminal:

heroku run bash

Once inside the web dyno, look around and find where the new-relic jar file is and point the environment variable to it.

Hopefully, that’s all you need. I did encounter other issues, but mostly related by not having the newrelic.yml file in the right place (or not having the configuration pointing to the right place).

Uploading to Amazon S3 – Response for preflight is invalid (redirect – 307)

Response for preflight is invalid – redirect 307

Hi there!

Just wanted to make a quick post about an error message (Response for preflight is invalid – redirect) that can probably confuse someone while working with Amazon S3 uploads directly from the browser.

I’d been testing uploads to Amazon S3 using Ember Plupload (a wrapper around Plupload) to a development bucket directly from the browser. I activated CORS by using this example and the S3 example in Ember Plupload page as it was required for direct uploads.

After I got everything working, I decided to create a “production” bucket and deploy my application pointing to that new bucket. Immediately I started getting this strange error in Chrome’s network tab while making the preflight request (the OPTIONS request).

Response for preflight is invalid (redirect) – 307

Essentially the response was a 307 redirect, instead of the 200 OK that I was expecting, and that was working on the development bucket.

Since uploading to the development bucket was working, it could only be some configuration or state that was wrong.

I checked and double checked the configurations and they were the same. I started googling without finding anything that helped.

I then looked really good at the response and noticed that the redirect was to a slightly different link than what I was expecting, it was redirecting me “https://mybucket.s3-eu-west-1.amazonaws.com” instead of the original url which was “https://mybucket.s3.amazonaws.com”.

I tried changing the upload url to this “redirect” and it started working, I checked the responses for the development bucket, and there was no mention of the “s3-west-1” anywhere.

After that I found this comment on github:

The reason his happens (and also the reason why it self-resolves), is that when you set up an S3 bucket, there’s a certain time during which the global bucket URL is not available, so AWS redirects to the region-specific URL.

The redirect response that Amazon sends back when you request the global URL doesn’t have CORS headers, so requests will fail until the DNS has propagated.

Which has a reference to S3’s documentation:

From the documentation:

Temporary redirects automatically redirect users who do not have DNS information for the requested bucket. This occurs because DNS changes take time to propagate through the Internet. For example, if a user creates a bucket with a location constraint and immediately stores an object in the bucket, information about the bucket might not yet have been distributed throughout the Internet. Because the bucket is a subdomain of s3.amazonaws.com, Amazon S3 redirects it to the correct Amazon S3 location.

So, I basically only had to wait until Amazon propagated DNS information (took about 2 hours or so, I think). But since it didn’t happen with the development bucket (which I created before I started developing…. so, it makes sense) I got lost there.

Well, I hope that this might spare you some headaches…. just wait a bit 🙂

Happy coding!

EmberJS – Failed to execute ‘setAttribute’ on ‘Element’: ‘=’ is not a valid attribute name.

Hi

Just wanted to do a quick post about this error I got when developing an EmberJS Application and trying to test a component (via an Integration test). The following error occurred while running the test:

Error: Failed to execute 'setAttribute' on 'Element': '=' is not a valid attribute name.
    at Error (native)
    at DOMHelper.prototype.setAttribute (http://localhost:4200/assets/vendor.js:12027:13)
    at Object.buildFragment (http://localhost:4200/assets/weldnote.js:24465:13)
    at getCachedFragment (http://localhost:4200/assets/vendor.js:55321:29)
    at Function.RenderResult.build (http://localhost:4200/assets/vendor.js:55044:20)
    at render (http://localhost:4200/assets/vendor.js:55008:37)
    at http://localhost:4200/assets/vendor.js:55799:11
    at renderAndCleanup (http://localhost:4200/assets/vendor.js:55836:18)
    at Object.block [as default] (http://localhost:4200/assets/vendor.js:55797:9)
    at keywords.yield (http://localhost:4200/assets/vendor.js:54620:25)

I was trying to create an integration test for a component like the following (the default generated test, where I removed the block form assertion):

import { moduleForComponent, test } from 'ember-qunit';
import hbs from 'htmlbars-inline-precompile';

moduleForComponent('/w-powerselect', 'Integration | Component | w powerselect', {
  integration: true
});

test('it renders', function(assert) {
  assert.expect(1);

  // Set any properties with this.set('myProperty', 'value');
  // Handle any actions with this.on('myAction', function(val) { ... });

  this.render(hbs`{{w-powerselect}}`);

  assert.equal(this.$().text().trim(), '');
});

It was an error message I never seen before, but sure enough it was a simple problem. I had this in my component handlebars template:

<label data-test='label'=>{{label}}</label> 
{{#if canEdit}} 
  <div class="w-powerselect-addon"> 
  <div class='w-powerselect-field' data-test='select-container'>
Can you spot the error? Look closely at the ‘data-test=’label’=>‘. Somehow I left that second ‘=‘ (equal) sign there and it doesn’t make HTMLBars fail the compilation but at runtime it blows up with this weird error.
Happy coding!